3.4.1.1. Installing SIMP from an ISO
SIMP can be installed from a bootable ISO, which provides many advantages:
- Provides a ready-to-go OS, Puppet server, and SIMP installation
- Suitable for use in network-isolated enclaves/offline environments
- Ensures OS is configured with compliance-relevant install-time options:
- The Disk Partitioning scheme is compatible with most security guides
- The OS will boot in FIPS mode
- Disks will be encrypted
- (Please note the important caveats in the Disk Encryption section)
3.4.1.1.1. Obtaining a SIMP ISO file
You can obtain a SIMP installation ISO using one of the following methods:
- Downloading an ISO image file
- Official releases are available at https://download.simp-project.com/simp/ISO/
- [Advanced] Building a SIMP ISO for yourself
- The contents of the ISO can be customized to your preferences.
- This is the only way to obtain a SIMP ISO that installs a licensed commercial OS, such as Red Hat Enterprise Linux (RHEL).
3.4.1.1.2. Installing the OS
A SIMP ISO will install its OS + SIMP on any host that supports the underlying operating system.
Install as follows:
Boot the system using the SIMP ISO.
The ISO will load into a screen of boot options. The presentation will differ, depending on the boot firmware and ISO OS:
BIOS 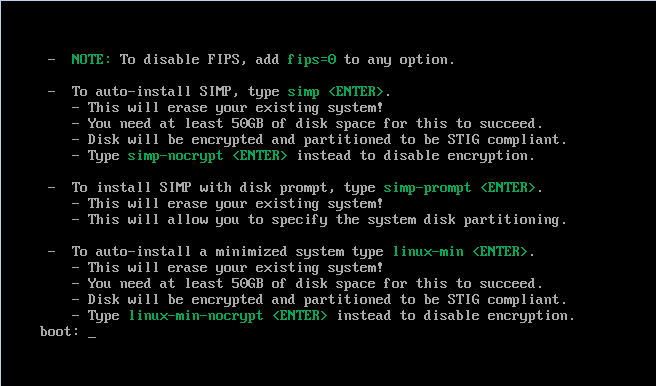
UEFI (el6) 
UEFI (el7) 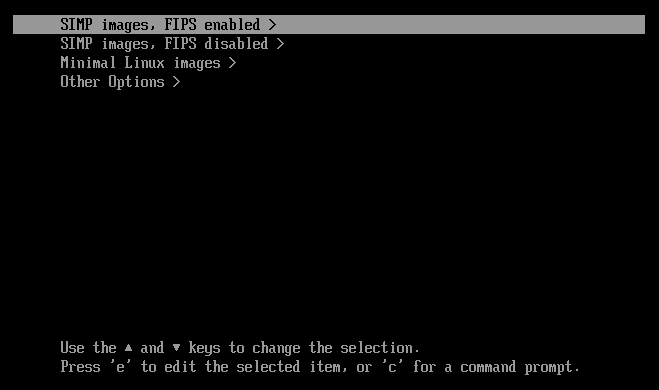
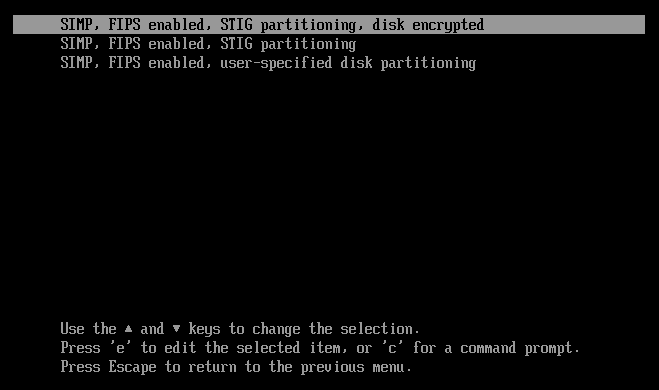
Press Enter to boot the standard SIMP installer, or customize the installation using the boot options.
Note
For details about how SIMP implements disk encryption (enabled by default), see: Disk Encryption.
Once installation starts, you may see the graphical interface spawn.
Warning
You should NOT interact with the GUI unless you have elected to manage your own disk partitions (e.g.,
simp-prompt).Note
If you have opted to manage your own disk partitions with (e.g.,
simp-prompt), follow the GUI instructions to enter your partition scheme.For example, using SIMP for CentOS 7:
- Click the
INSTALLATION DESTINATIONbutton - Configure the desired partitioning
- Click the
DONEbutton to finalize your disk selections - Click the
Begin Installationbutton on the main GUI page to continue.
No further GUI interaction will be required.
Tip
When applying disk encryption (enabled by default), the system may seem to pause and display messages about increasing entropy. You can speed up the installation by pressing random keys on the keyboard for a bit (this will generate additional entropy).
- Click the
When the installation is complete, the system will restart automatically.
Note
When the system boots, it may display:
error on start module sha1 not
found could not insert sha_256 [...]
. This is expected and is a known issue.Change the default passwords.
Warning
There are default passwords present on the system that should be changed prior to deploying the system.
Please make sure that you change these passwords!
Note
See the What is the Password Complexity for SIMP? FAQ for tips on setting a functional password.
- Change the
rootuser password.
- At the console, log on as
rootand type the default password shown in SIMP Default Passwords- Follow the prompts to complete the password change
- Change the
simpuser password.
- At the console, log on as
simpand type the default password shown in SIMP Default Passwords- Follow the prompts to complete the password change
3.4.1.1.3. SIMP Default Passwords
Below is a table containing the default passwords found on a basic SIMP server upon install.
Important
All default passwords must be changed during the initial configuration process.
| Utility | Password |
|---|---|
| Grub | GrubPassword |
| Root User | RootPassword |
| Simp User | UserPassword |
Table: SIMP Default Passwords
3.4.1.1.4. Next Steps
Now that your system has been installed, you should proceed to Initial SIMP Server Configuration to complete the initial setup.